Soundproofing Timber Floors with PhoneStar
Soundproofing Timber Joist Floors
Soundproofing timber or metal joist floors with PhoneStar acoustic insulation is a relatively easy task and gives excellent results at reducing both airborne sound (such as talking, television or music noise) and impact sound (such as footstep noise or furniture being dragged overhead) through timber joist floors.
There are three options available for sound insulating timber or metal joist floors. The option chosen depends on the level of noise you are experiencing and whether you have access to the cavity and ceiling below. Standard timber joist floors are generally poor acoustically due to their lightweight structure. The PhoneStar board provides excellent sound insulation due to its high density, high mass and loose, soft silica sand filling.
Option 1 offers the most effective overall floor soundproofing solution, but it requires access to the cavity and ceiling below. Options 2 and 3, on the other hand, can still provide good results even without access to the ceiling below.
Downloads:
Option 1 - Optimum Solution
Decoupled Timber Joist Floor Solution
Thickness: 15mm on floor above and 29 – 46mm on ceiling below
Expected Impact Sound Improvement: 19dB approx.
- Expected Airborne Sound Improvement: 19dB approx.
This solution is recommended for new floors and existing floors if you have access to the ceiling below. We strongly recommend that any existing plasterboard is removed as it can vibrate off the joists and walls. This system is particularly recommended for separating dwellings as it goes beyond the requirements set out by Building Regulations for Sound.
Our best solution incorporates PhoneStar sound insulation boards being laid floating on top of the timber floorboards, so this adds considerable mass to the floor structure. Because the PhoneStar is laid floating, it also provides a resilient layer. We highly recommend filling the empty floor cavity with high density mineral wool to reduce echoes and reverberation within the cavity. Then the plasterboard is fixed to resilient bars which are screwed to the underside of the timber joists. Resilient bars are thin, steel channels that absorb vibrations and greatly reduce sound transmission through the floor and ceiling. By decoupling the ceiling, the path of sound transmission is broken and therefore results improve significantly. This system offers excellent soundproofing performance for timber joist floors because it incorporates the two important elements of soundproofing – adding a heavy, dense, soft product and decoupling the materials from each other.
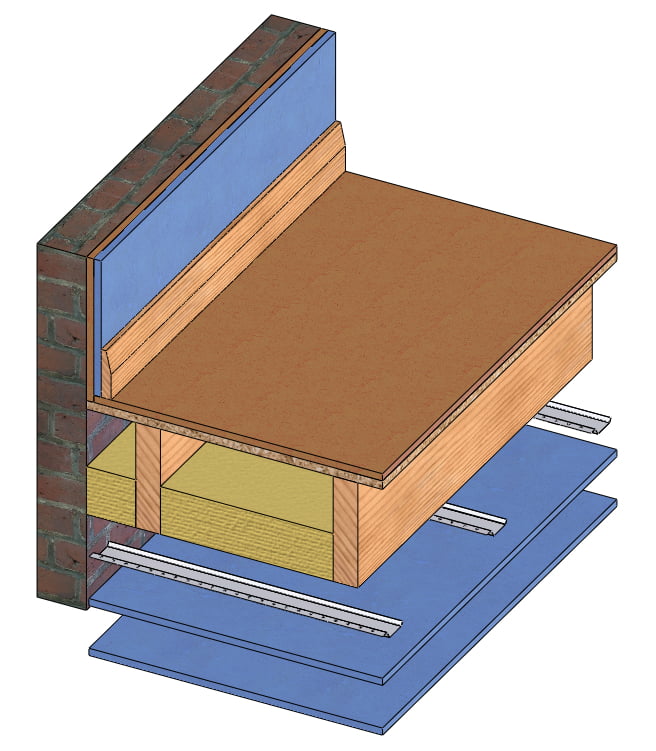
Construction from Top Down
- Finished floor covering
- 15mm PhoneStar TRI Acoustic Insulation
- 18mm chipboard / OSB / floorboards
- 235mm approx. solid timber joists or I-Joists
- 100mm deep x 45kg/m³ mineral wool between joists
- 16mm standard Resilient Bars
- 12.5 or 15mm Acoustic Plasterboard
- Note: A second layer of 15mm acoustic plasterboard is required for New Build or Change of Use Separating Floors between dwellings for fire regulations, as shown.
Have you also considered Flanking Noise? Flanking Noise is important to consider when installing sound insulation.
Please download the full Installation Instructions for Soundproofing Floors before commencing work.
- PhoneStar TRI Acoustic Insulation on Floor (1200mm x 800mm x 15mm)
- PhoneStar Eco-Tape (50mm x 50M)
- 100mm thick high density (45kg/m³) Mineral Wool in between joists
- Resilient bars Ref: RB1 (3M x 75mm x 16mm deep)
- Drywall screws to secure resilient bars to joists
- 12.5 or 15mm acoustic plasterboard and skim. (Optional 2nd layer of plasterboard)
- Drywall screws (25mm length) to secure plasterboard to resilient bars
- Acoustic or Intumescent Sealant
FLOOR ABOVE
- Fill the void between the joists with 100mm x 45kg/m³ high-density mineral wool, by accessing the void from above or below.
- Examine the timber sub-deck and fill any holes or gaps with flexible mastic or acoustic sealant – tradesmen will often tack down 3mm hardboard sheets to level and seal. Also seal around the perimeter walls.
- Ensure the floor surface is clean and even.
- Begin in one corner and lay the PhoneStar boards on the sub-deck, butted tightly up to the perimeter walls. Do not screw or nail the boards down.
- Butt each PhoneStar board tightly to each other and do not leave any gaps between, or around, the PhoneStar layer. Install the boards in a brickwork formation. See Cutting and Taping PhoneStar Guide on last page of Installation Instructions.
- Install the finished floor surface as per Fitting Floor Coverings over PhoneStar in Installation Instructions.
- Fit skirting boards ensuring no contact with the floor – leave a 2mm gap.
CEILING BELOW
- Existing plasterboard on the ceiling below should preferably be removed because it will be vibrating off the joists and walls. Secure the resilient bars at 400mm centres, and perpendicular to underside of joists, using drywall screws. Ensure bar ends do not touch the perimeter walls – leave a 5mm gap. Note: the first and last bars should be approximately 50mm clear of the nearest walls.
- Screw plasterboard into the resilient bars with 25mm drywall screws ensuring these do not touch the timber joists – leave a 5mm perimeter gap around the perimeter walls.
- Optionally add second layer of plasterboard with staggered joints.
- Seal 5mm perimeter gaps with acoustic or intumescent sealant.
- Finish the plasterboard as required.
- Consider treating any identified flanking walls with PhoneStar.
Option 2 - Excellent Solution
Top & Cavity Only - Timber Joist Floor Solution
Thickness: 15mm on floor above
Expected Impact Sound Improvement: 7dB approx.
- Expected Airborne Sound Improvement: 10dB approx.
This solution is recommended for existing floors where you don’t have access to the ceiling below and it is commonly used to reduce noise from noisy neighbours below or from noise going between upstairs and downstairs within your own home or workplace. The PhoneStar board provides excellent acoustic insulation due to its high density, high mass and loose, soft silica sand filling so it adds considerable mass to the lightweight floor. However, the results will not be as effective as Option 1 because there is no decoupling in the floor and ceiling structure so everything is touching each other, meaning that the sound-bridge is not broken.
This solution incorporates high-density mineral wool being placed in the floor cavity as this will reduce echoes and reverberation within the cavity. This may already be in place in some floors. Then PhoneStar acoustic insulation board is laid floating over the floorboards. This resilient layer will absorb much of the thudding noise heard when people walk around upstairs and will also reduce much of the airborne noise that goes between upstairs and downstairs in both directions. This PhoneStar floor soundproofing solution will only raise the floor height by 15mm and it can easily be carried out as a DIY project.

Construction from Top Down
- Finished floor covering
- 15mm PhoneStar TRI Acoustic Insulation
- 18mm chipboard / OSB / floorboards
- 235mm approx. solid timber joists or I-Joists
- 100mm deep x 45kg/m³ mineral wool between joists
- Existing plasterboard
Have you also considered Flanking Noise? Flanking Noise is important to consider when installing sound insulation.
Please download the full Installation Instructions for Soundproofing Floors before commencing work.
- PhoneStar TRI Acoustic Insulation on Floor (1200mm x 800mm x 15mm)
- PhoneStar Eco-Tape (50mm x 50M)
- 100mm thick high density (45kg/m³) Mineral Wool in between joists
- Acoustic or Intumescent Sealant
FLOOR ABOVE
- Fill the void between the joists with 100mm x 45kg/m³ density mineral wool, by accessing the void from above.
- Re-fit the floorboards or lay a new timber deck. Examine this timber sub-deck and fill any holes or gaps with flexible mastic or acoustic sealant – tradesmen will often tack down 3mm hardboard sheets to level and seal. Also seal around the perimeter walls.
- Ensure the floor surface is clean and even.
- Begin in one corner and lay the PhoneStar boards on the sub-deck, butted tightly up to the perimeter walls. Do not screw or nail the boards down.
- Butt each PhoneStar board tightly to each other and do not leave any gaps between, or around, the PhoneStar layer. Install the boards in a brickwork formation. See Cutting and Taping PhoneStar Guide on last page of Installation Instructions.
- Install the finished floor surface as per Fitting Floor Coverings over PhoneStar in Installation Instructions.
- Fit skirting boards ensuring no contact with the floor – leave a 2mm gap.
Option 3 - Very Good Solution
Top Only, Excluding Cavity - Timber Joist Floor Solution
Thickness: 15mm on floor above
Expected Impact Sound Improvement: 6dB approx.
- Expected Airborne Sound Improvement: 7dB approx.
This solution is recommended for existing floors where you don’t have access to the floor cavity or ceiling below and it is typically used to reduce noise going between upstairs and downstairs within your own home or workplace or from noisy neighbours below. The high density, high mass and loose, soft silica sand filling in the PhoneStar boards add considerable mass to the lightweight floor so this improves the acoustic insulation. However, the results will not be as effective as Option 1 due to there being no decoupling or separation in the floor and ceiling structure, so the sound-bridge will not be broken as all elements of the floor structure are connected to each other.
This solution incorporates PhoneStar acoustic insulation board being laid floating over the floorboards. This resilient layer will absorb some of the impact noise heard when people walk around upstairs and will also reduce some of the airborne noise that goes between upstairs and downstairs in both directions. This PhoneStar floor soundproofing solution is easy to install as a DIY project and it only raises the floor height by 15mm.

Construction from Top Down
- Finished floor covering
- 15mm PhoneStar TRI Acoustic Insulation
- 18mm chipboard / OSB / floorboards
- 235mm approx. solid timber joists or I-Joists left empty
- Existing plasterboard
Have you also considered Flanking Noise? Flanking Noise is important to consider when installing sound insulation.
Please download the full Installation Instructions for Soundproofing Floors before commencing work.
- PhoneStar TRI Acoustic Insulation on Floor (1200mm x 800mm x 15mm)
- PhoneStar Eco-Tape (50mm x 50M)
- Acoustic or Intumescent Sealant
FLOOR ABOVE
- Examine the timber sub-deck and fill any holes or gaps with flexible mastic or acoustic sealant – tradesmen will often tack down 3mm hardboard sheets to level and seal. Also seal around the perimeter walls.
- Ensure the floor surface is clean and even.
- Begin in one corner and lay the PhoneStar boards on the sub-deck, butted tightly up to the perimeter walls. Do not screw or nail the boards down.
- Butt each PhoneStar board tightly to each other and do not leave any gaps between, or around, the PhoneStar layer. Install the boards in a brickwork formation. See Cutting and Taping PhoneStar Guide on last page of Installation Instructions.
- Install the finished floor surface as per Fitting Floor Coverings over PhoneStar in Installation Instructions.
- Fit skirting boards ensuring no contact with the floor – leave a 2mm gap.