Soundproofing Concrete Floors with PhoneStar
Soundproofing Concrete Floors
When it comes to soundproofing concrete floors, using the versatile PhoneStar acoustic insulation product can give you excellent outcomes. PhoneStar boards are very effective in reducing both impact sound (such as footstep noise or furniture being dragged overhead) and airborne sound (such as talking, television or music) that travels through concrete floors.
There are two methods available for acoustically insulating concrete floors. The choice of method depends on the level of noise you’re experiencing and whether you have access to the ceiling below. Solid concrete floors generally provide good airborne sound insulation if they’re installed correctly. However, concrete floors tend to perform poorly at reducing impact sound. This means that a resilient layer should be installed directly beneath the floor covering to absorb the noise caused by footsteps or items being dropped on the floor.
Sometimes, concrete floors allow significant airborne noise to pass through them due to various factors, such as being hollow core floors, having cracks or holes for radiator pipes or experiencing Flanking Noise from adjacent areas.
Option 1 offers the most effective overall soundproofing solution, but it requires access to the ceiling below. Option 2, on the other hand, can still provide very good results even without access to the ceiling below.
Downloads:
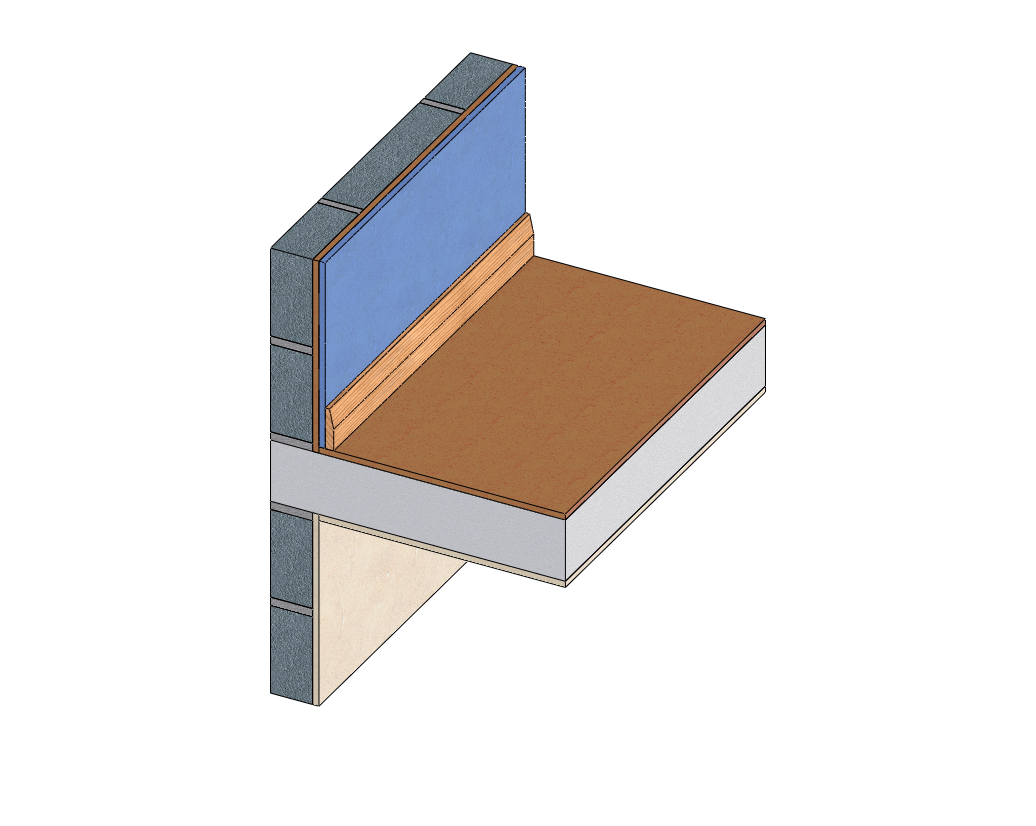
Option 1 - Optimum Solution
Decoupled Concrete Floor Solution
Thickness: 15mm on floor above and 79 – 81mm on ceiling below
Expected Impact Sound Improvement: 28 – 30 dB approx.
- Airborne Sound Insulation will also improve significantly
We recommend this option for new floors and existing floors if you have access to the ceiling below. This solution incorporates PhoneStar sound insulation boards being laid floating on top of the concrete floor, creating a resilient layer that absorbs the noise caused by footsteps. Additionally, the ceiling below is decoupled or separated from the floor above. This is achieved by fixing timber battens to the underside of the concrete ceiling. We highly recommend filling this empty space with high-density mineral wool to reduce echoes and reverberation. The plasterboard is then fixed to resilient bars, which are thin, steel channels that absorb vibrations and greatly reduce sound transmission through the floor and ceiling.
While concrete floors are heavy and dense, which is generally good for blocking airborne sound, they can vibrate significantly due to their hardness and rigidity. By decoupling the ceiling, we break the path of sound transmission and therefore significantly improve results. This system goes beyond the requirements set by Building Regulations and offers excellent soundproofing performance for concrete floors.

Construction from Top Down
- Finished floor covering
- 15mm PhoneStar TRI Acoustic Insulation
- Solid concrete floor
- 50 x 50mm timber battens
- Optional: 50mm deep x 45kg/m³ mineral wool in between battens (recommended)
- 16mm standard Resilient Bars
- 12.5 or 15mm Acoustic Plasterboard
- Optional second layer of plasterboard
Have you also considered Flanking Noise? Flanking Noise is important to consider when installing sound insulation.
Please download the full Installation Instructions for Soundproofing Floors before commencing work.
- PhoneStar TRI Acoustic Insulation on Floor (1200mm x 800mm x 15mm)
- PhoneStar Eco-Tape (50mm x 50M)
- 50mm x 50mm timber battens
- 6mm diameter hammer fixings to secure battens directly to concrete ceiling
- Optional: 50mm thick high density (45kg/m³) Mineral Wool in between battens (recommended)
- Resilient bars Ref: RB1 (3M x 75mm x 16mm deep)
- Drywall screws to secure resilient bars to battens
- 12.5 or 15mm acoustic plasterboard and skim
- Drywall screws (25mm length) to secure plasterboard to resilient bars
- Acoustic or Intumescent Sealant
FLOOR ABOVE
- Treat new concrete floors with a damp proof membrane.
- Ensure the floor is clean, dry and sufficiently level.
- Begin in one corner and lay the PhoneStar boards floating on the concrete floor, butted tightly up to the perimeter walls. Do not screw or nail the boards down.
- Butt each PhoneStar board up tightly to each other and do not leave any gaps between, or around, the PhoneStar layer. Install the boards in a brickwork formation. See Cutting and Taping PhoneStar Guide on last page of Installation Instructions.
- Install the finished floor surface as per Fitting Floor Coverings over PhoneStar in Installation Instructions.
- Fit skirting boards ensuring no contact with the floor – leave a 2mm gap.
CEILING BELOW
- Make ceiling below sound by removing any loose material.
- Secure timber battens to ceiling with hammer fixings ensuring 400mm centres for width of mineral wool to be a push fit. This is highly recommended to reduce vibrations.
- Insert dense mineral wool between battens to fill cavity void.
- Secure the resilient bars at 400mm centres and perpendicular to the battens using drywall screws. Ensure bar ends do not touch the perimeter walls – leave a 5mm gap. Note: the first and last bars should be approximately 50mm clear of the nearest walls.
- Screw plasterboard into the resilient bars with 25mm drywall screws and ensure that they do not touch the timber battens or concrete ceiling – leave a 5mm perimeter gap around the perimeter walls.
- Optionally add second layer of plasterboard with staggered joints.
- Seal 5mm perimeter gaps with acoustic or intumescent sealant.
- Finish the plasterboard as required.
- Consider treating any identified flanking walls with PhoneStar.
Option 2 - Very Good Solution
Concrete Floor Solution - Top Only
Thickness: 15mm on Floor Above
Expected Impact Sound Improvement: 22 dB approx.
- Airborne Sound Insulation will also improve
This simple solution incorporates PhoneStar acoustic insulation board being laid floating on the concrete floor so this resilient layer will absorb much of the thudding noise heard when people walk around or drop something onto the concrete floor above you. It will only raise the floor height by 15mm. This solution can easily be carried out as a DIY project and is used when there is no access to the ceiling below.
Because concrete floors are heavy and dense, they should already provide good airborne sound insulation, but if they don’t due to various factors, PhoneStar will certainly improve this. The PhoneStar board provides excellent acoustic insulation due to its high density, high mass and loose, soft silica sand filling. This system should surpass Building Regulation requirements for Sound.
Construction from Top Down
- Finished floor covering
- 15mm PhoneStar TRI Acoustic Insulation
- Solid concrete floor
Have you also considered Flanking Noise? Flanking Noise is important to consider when installing sound insulation.
Please download the full Installation Instructions for Soundproofing Floors before commencing work.
- PhoneStar TRI Acoustic Insulation on Floor (1200mm x 800mm x 15mm)
- PhoneStar Eco-Tape (50mm x 50M)
- Acoustic or Intumescent Sealant
FLOOR ABOVE
- Treat new concrete floors with a damp proof membrane.
- Ensure the floor is clean, dry and sufficiently level.
- Begin in one corner and lay the PhoneStar boards floating on the concrete floor, butted tightly up to the perimeter walls. Do not screw or nail the boards down.
- Butt each PhoneStar board up tightly to each other and do not leave any gaps between, or around, the PhoneStar layer. Install the boards in a brickwork formation. See Cutting and Taping PhoneStar Guide on last page of Installation Instructions.
- Install the finished floor surface as per Fitting Floor Coverings over PhoneStar in Installation Instructions.
- Fit skirting boards ensuring no contact with the floor – leave a 2mm gap.